The Albuquerque Game Developers Guild Arcade Cabinet is where game developers get a chance to showcase their work to the local community in a fun high profile way! To submit a game to the AGDG Arcade Cabinet you will need to have a game you will have to meet all requirements. Please follow each requirement below before submitting.
System Requirements
- Run on the Windows 7 or higher operating system.
- Must be able to run as a .exe
- Be compatible with the Arcade Controller
- No game crashing bugs
- Must not have any malicious software/code that can corrupt the system.
- Must run on a 16:9 screen ratio (target resolutions can include 1280×720, 1600×900, 1920×1080, 3640×2160)
Content Requirements
Since this system is going to be for a general audience try to keep your game below an M rating.
- No sexual content
- No over violent content
- Cursing should be kept to a PG rating.
- No using other people’s trademarked or copyrighted content without permission.
Media Requirements
- Game Title
- Description of your game in 200 words or less.
- Creator or studio name
- Genre tags of your game (eg. Platformer, Shooter, etc.). You may have multiple tags.
- Number of Players (The cabinet has 2 controllers but you can be creative and have more players)
- Screenshots of your gameplay at 1920×1080 resolution in either .jpg or .png format
- (Optional) Video of your gameplay or game trailer at 1920×1080 resolution in .mp4 format.
How to Submit
- Download the ArcadeGame.zip file to your computer. Unzip the folder to your computer.
- Rename the folder to your game title without spaces using capital letters for each separate word (eg. Sky Pets -> SkyPets)
- Copy your game to the new folder.
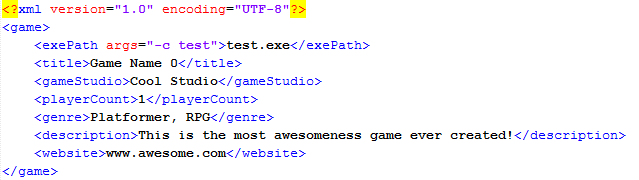
- Right click on the game.xml and click edit to open notepad.exe
- In the <title> brackets put your games name.
- In the <gameStudio> brackets put your studio’s name or your name.
- In the <description> brackets put a description of your game.
- In the <playerCount> brackets put the number of players (ex. 1-2)
- In the <exePath> brackets put the path to your .exe (ex. If your .exe is in the same folder as the XML document then put GameName.exe, if it’s in a folder directory then put the path like /GameFolder/GameName.exe) If you need to pass arguments to your game then add the args attribute to the tag (eg. <exePath args=”-popupwindow”>game.exe</exePath>)
- Save the game.xml and close notepad.exe
- Open the media folder and copy your screenshots and videos in the folder.
- Rename your images to numbers starting from 0 in the order you want them presented. (ex. 0.png, 1.jpg, 2.png, etc.)
- Rename your videos to numbers starting from 0 in the order you want them presented. Maximum 2 videos (ex. 0.mp4, 1.mp4)
Your game.xml file should look like this.
Zip up your game folder and upload it to either Dropbox or Google Drive and email the link to abqgames@gmail.com your game will then be pending review.
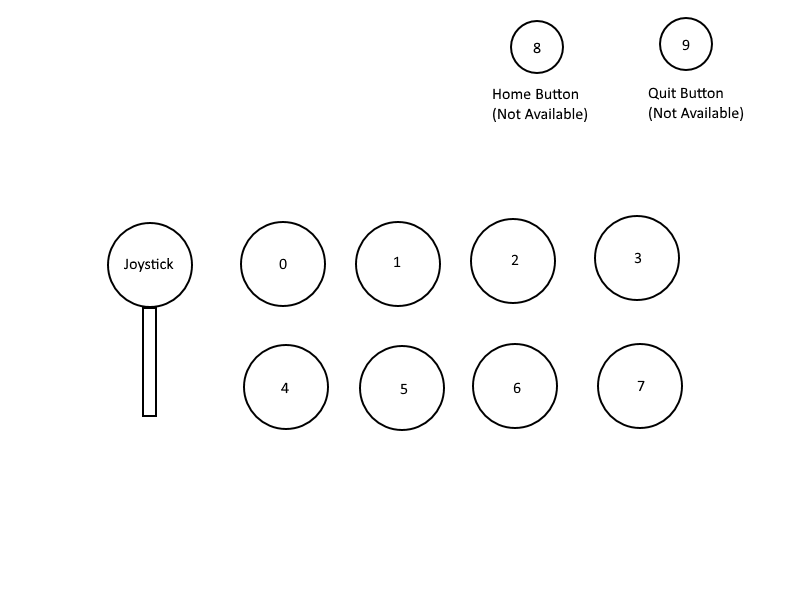
Controller Layout
The arcade machine will have 2 player controller layouts each with a joystick and 8 buttons for your game. The machine will also have a home button that will quit your game and go back to the arcade front end and a killswitch which exits the arcade machine, these buttons should not be used in your game and will result in your game failing lotcheck if implemented.
Unity Guidelines
The process to set up your Unity game for the AGDG arcade machine is fairly easy and straight forward.
Input Setup
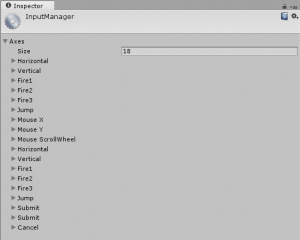
Unity Input Manager
Open your Unity Project and go to Edit->Project Settings -> Input
First, we’re going to set up the buttons.
Click into the Size text box and add 1 to the number in there. For our example, the Size will be 19. You will see the last input copied.
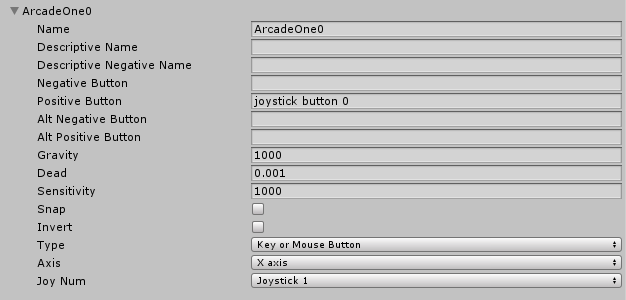
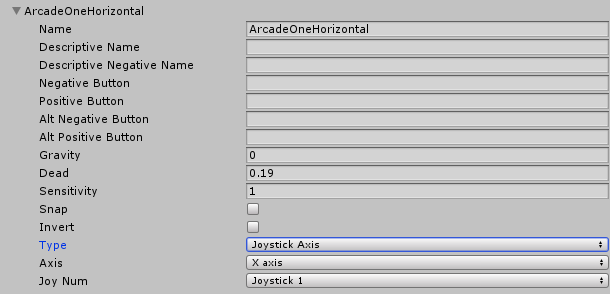
In the new input copy the values from the screenshot below.
Once you have that click into the Size text box again and add 7 to that number. For our example, the new size will be 26.
Go through each new entry and follow these instructions.
- Change the name for each one to the button number (eg. ArcadeOne0, ArcadeOne1, etc.)
- Change the Positive Button number to the button number (eg. joystick button 0, joystick button 1, etc)
Once you have done this for all the new entries we have set up for one controller. We will now get the buttons for the second controller.
Change your Size and add 8 more inputs (we’re now at 34).
Go through each new entry and follow these instructions.
- Change the name so it matches ArcadeTwo0 (eg. ArcadeTwo0, ArcadeTwo1)
- Change the Joy Num from Joystick 1 to Joystick2
Once you have all of these buttons setup we will get the joystick inputs.
Add 1 to the Size (we’re now at 35) and make the input match below.
Add 1 to the Size (now at 36)
Change the name so it will be ArcadeOneVertical and change the Axis to Y axis.
Add 2 to the Size and change the name for ArcadeTwoHorizontal and ArcadeTwoVertical along with setting the correct Axis. Also, change the Joy Num to Joystick 2
Now that you have all of the inputs in the Unity Input Manager you can call them from code. Here is a small code snippet on how you will call the inputs.
void Update () {
  float horOne = Input.GetAxis("ArcadeOneHorizontal");
  float verOne = Input.GetAxis("ArcadeOneVertical");

  Debug.Log ("Player One Hor: " + horOne + " Ver: " + verOne);

  if (Input.GetButtonDown("ArcadeOne0")) {
    Debug.Log ("Player One Button 0");
  }

  if (Input.GetButtonDown("ArcadeTwo0")) {
    Debug.Log ("Player Two Button 0");
  }
}
Unity UI Settings
Make sure your UI can scale correctly and that your anchoring is set correctly so no UI element is clipped or offscreen. Your UI must also support JoyStick navigation. Click here to learn more about the Unity UI system.
Unity Build Settings
To get your game on the arcade machine your games build settings must be configured correctly or else you might fail review and have to resubmit.
First, go to Edit->Project Settings->Player to bring up the Player Settings.
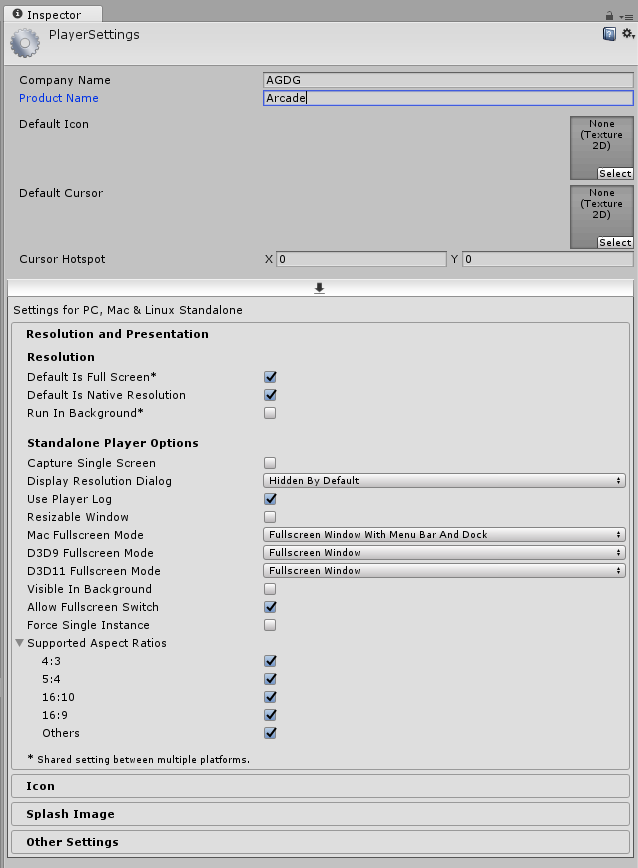
In these settings, you will have to set a few values.
- Change your Company Name to your studio or name.
- Change your Product Name to your games name.
- Set Default is Full Screen to true
- Set Default Is Native Resolution to true
- Set Display Resolution Dialog to Hidden by Default
Once you have all of these set you can build your game. Please output your game for the Windows Platform (x86 and x86_64 are both acceptable).
HTML5 Game Guidelines
To get your game onto the AGDG Arcade Cabinet it has to be able to work without a network connection and must not open to any external links through a web browser or else your game will fail review.
Because the arcade cabinet requires a portable .exe solution to run, you will need to use one of the solutions below (or a something similar) to execute your game.
Joystick control can be achieved in JavaScript with the use of Mozilla’s Gamepad API. See the platform-specific guides below for some examples specific to the arcade cabinet. Note that, by design, this API requires a gamepad event before activating any gamepads; thus, the first button press or joystick movement will be lost after game launch.
In case the arcade environment does not hide the mouse cursor for you, hide it with CSS like this (which doesn’t always work on body):
body {cursor: none;}
Electron
Electron provides a portable implementation of the Chrome browser that can be used to help HTML5 apps appear as native apps (plus access to other native functions). As far as we’re concerned here, Electron is a slightly smaller and easier-to-setup version of Chrome Portable in –kiosk or –app mode.
Assuming you’ve already built your game in another tool (including gamepad support) and you don’t need Electron for the rest of its native capabilities, here’s the short route to getting your game running in Electron:
- Download one of the latest (non-beta) prebuilt binary from Electron’s Releases page. Use one of the
electron-*-win32-x64.zipfiles. - Unzip it somewhere.
- Add an
appfolder to theelectron\resourcesfolder to createelectron\resources\app. - Download the arcade cabinet config files for Electron and unzip them to the
appfolder. (Contents:package.jsonandmain.js“ package.json tells Electron to load main.js, which calls your game’s index.html.) - Your game’s startup HTML file needs to be named
index.html. Copy that and all supporting files and folders into theappfolder. - Run
electron.exeto test. - Complete the How to Submit instructions above by copying the entire contents of the
electronfolder into your game folder as instructed in the submit steps.
If you need Chrome’s DevTools while testing, edit main.js and uncomment this line:
// mainWindow.webContents.openDevTools()
If you need a more robust test environment for Electron app development, see Electron’s Quick Start Guide to set up their Quick Start app, where you can drop in your game’s index.html and other files.
Optional
Rebranding: Rename electron.exe and edit it’s internal icon to whatever you want.
Joystick Mapping in Electron
| Joystick Left | navigator.getGamepads()[0].axes[0] == |
| Joystick Right | navigator.getGamepads()[0].axes[0] == |
| Joystick Up | navigator.getGamepads()[0].axes[1] == |
| Joystick Down | navigator.getGamepads()[0].axes[1] == |
| Joystick Center | navigator.getGamepads()[0].axes[0 |
| Button 0 | navigator.getGamepads()[0].buttons[0].pressed |
| Button 1 | navigator.getGamepads()[0].buttons[1].pressed |
| Button 2 | navigator.getGamepads()[0].buttons[2].pressed |
| Button 3 | navigator.getGamepads()[0].buttons[3].pressed |
| Button 4 | navigator.getGamepads()[0].buttons[4].pressed Primary |
| Button 5 | navigator.getGamepads()[0].buttons[5].pressed Secondary |
| Button 6 | navigator.getGamepads()[0].buttons[6].pressed |
| Button 7 | navigator.getGamepads()[0].buttons[7].pressed |
| Button Home | navigator.getGamepads()[0].buttons[8] DO NOT USE |
| Button Quit | navigator.getGamepads()[0].buttons[9] DO NOT USE |
| Button F1 | navigator.getGamepads()[1].buttons[8].pressed |
| Button F2 | navigator.getGamepads()[1].buttons[9].pressed |
The above is for Player 1. Player 2 is at getGamepads()[1]. Buttons F1 and F2 are shared from Player 2’s controller.
Simulating Keyboard Events in Electron
If you use a framework or game engine which exports JavaScript that doesn’t respond to gamepad events, you can turn gamepad events into keyboard events with code such as this:
function simKey(evt, char, code) { var e = new KeyboardEvent(evt, { bubbles: true, cancelable: true, key: char, shiftKey: false}); delete e.keyCode; Object.defineProperty(e, "keyCode", {"value": code}); document.dispatchEvent(e); //canvas.dispatchEvent(e); } function simKeyDown(char, code) { simKey("keydown", char, code); } function simKeyUp(char, code) { simKey("keyup", char, code); } //Call gameLoop() somewhere during load to start it. function gameLoop() { var gamepads = navigator.getGamepads(); var gp1 = gamepads[0]; // keypress: x=120 X=88 // keyup: x=88 X=88 Z=90 P=80 // ArrowLeft=37 ArrowRight=39 ArrowUp=38 ArrowDown=40 [space]=32if (gp1.buttons[4].pressed) { simKeyDown("X", 88); } else { simKeyUp("X", 88); Â } if (gp1.axes[0] < -0.5) { simKeyDown("ArrowLeft", 37); } else { Â simKeyUp("ArrowLeft", 37); Â } start = requestAnimationFrame(gameLoop); }
Note: This is specific to Electron/Chrome. Other browsers may require other solutions. This uses the newer KeyboardEvent() object constructor instead of the older initKeyEvent() and initKeyboardEvent() methods. Chrome never supported the older init methods. Yet, this also includes a hack to force the older keyCode property into the event object to support code written for the older init methods. PICO-8’s exported JavaScript requires this hack. Other code may not.
Electron and PICO-8
While PICO-8 was not intended to be an HTML5 platform, HTML is currently the only standalone export option for PICO-8 games.
- Refer to the PICO-8 Manual for instructions on exporting your cartridge(s) to an HTML and JS file.
- Download one of the latest (non-beta) prebuilt binary from Electron’s Releases page. Use one of the
electron-*-win32-x64.zipfiles. - Unzip it somewhere.
- Add an
appfolder to theelectron\resourcesfolder to createelectron\resources\app. - Download the arcade cabinet config files for PICO-8 and unzip them to the
appfolder. (Contents:package.json,main.jsandindex.html“ package.json tells Electron to load main.js, which calls index.html, which calls your game’s game.js.) - Copy your game’s JS file (i.e.
mygame.js) to theappfolder and rename it togame.js. (You can ignore your game’s HTML file, the providedindex.htmlreplaces it for use with the arcade cabinet.) - Run
electron.exeto test. - Complete the How to Submit instructions above by copying the entire contents of the
electronfolder into your game folder as instructed in the submit steps.
If you need Chrome’s DevTools while testing, edit main.js and uncomment this line:
// mainWindow.webContents.openDevTools()
Joysticks and PICO-8
The provided index.html file sets up 2 joysticks with 2 buttons each. This should work for most games without modification. If, however, your game is for more than 2 players or uses buttons from other joysticks creatively, you will need to modify index.html to your needs.
Also note that PICO-8 does not define which action button is primary (BTN(4) or BTN(5)) or, even, which P8SCII glyph is primary (X or O). This has led to the current library of PICO-8 games being split as to which is primary. Thus, the standard here assumes that the image of the controller seen in PICO-8’s KEYCONFIG program follows the Game Boy layout, which would make button X primary and, thus, BTN(5) primary (which is also keyboard key X for player 1). If your code is written the other way, you will need to either reverse your code or reverse the code in index.html so that button 4 on the cabinet is always primary. If you use the P8SCII button glyphs on screen in your game, it is recommended you indicate button X as primary.
| Button | P8 Code | P8 Glyph | P8 Player 1 | Cabinet | Gamepad API | pico8_buttons[] |
| Primary | BTN(5) |
Button X | Key X | Button 4 | buttons[4] |
0b100000 |
| Secondary | BTN(4) |
Button O | Key Z | Button 5 | buttons[5] |
0b010000 |
Buttons F1 and F2 on the arcade cabinet are both set to activate the PICO-8 pause menu. One of these buttons could be set to a quick reset (Ctrl+R) but the pause menu offers a safer reset option.
Optional
Edit index.html to set a background color other than gray. This file also sets the game div size to the largest multiple of 128px that will fit. You probably don’t want to mess with that, but may.
Other Portable Browsers
At the time of this writing, Firefox appears to have some lag issues with sound and Chrome/Electron is performing well on all fronts. Considering that Electron setup is also easier and smaller than portable browser setup, there seems to be little reason to expand this section.
Simple DirectMedia Layer (SDL) Guide
For games that use SDL2 for input events, here is the default mapping string for the arcade cabinet controllers (from SDL_GameControllerDB):
79000600000000000000504944564944,NGS

Phantom,a:b2,b:b3,y:b1,x:b0,start:b9,back:b8,leftstick:b10,rightstick:b11,leftshoulder:b4,rightshoulder:b5,dpup:h0.1,dpleft:h0.8,dpdown:h0.4,dpright:h0.2,leftx:a0,lefty:a1,rightx:a2,righty:a4,lefttrigger:b6,righttrigger:b7,platform:Windows,
The buttons are the same as the above diagram (b0 – b7), joystick x is a0 and joystick y is a1.
You will likely want to override the default button mappings from above. For example, you might change a:b2,b:b3,y:b1,x:b0 to a:b4,b:b5,y:b7,x:b6 or a:b4,b:b5,y:b1,x:b0 (etc.) and then save the new string to your game’s SDL controller file (i.e. gamecontrollerdb.txt).